In the previous post I had EAS Cloud → TestFlight working, but EAS build minutes still matter sometimes.
So I tried Xcode Cloud. Apple Developer Program includes 25 free hours per month — handy for solo projects, and this is the flow I personally use day to day.
Expo apps don’t come ready for Xcode Cloud’s build environment, so you need to prep everything in ci_post_clone.sh.
Steps below follow template-expo-build-cicd.
Sample repository
Same template as the previous post.
It already has eas.json and app.json — swap Bundle ID and related values.
git clone https://github.com/testkun08080/template-expo-build-cicd.git
cd template-expo-build-cicd
npm ci
The template expects Node.js 20.x (eas.json base.node is 20.18.0).
The Xcode Cloud ci_post_clone.sh also installs Node 20 via Homebrew when it’s missing.
What to replace after clone
| File | Replace |
|---|---|
app.json | ios.bundleIdentifier / extra.eas.projectId |
ios/templateexpobuild.xcodeproj/project.pbxproj | DEVELOPMENT_TEAM / PRODUCT_BUNDLE_IDENTIFIER |
extra.eas.projectId isn’t used by Xcode Cloud directly, but local expo prebuild is smoother if you’ve already run eas init.
Also check “What to replace after clone” in the previous post.
EAS Cloud vs Xcode Cloud
Reframing the previous EAS Cloud post from the Xcode Cloud side:
| EAS Cloud | Xcode Cloud | |
|---|---|---|
| Mac required | No | No (Apple-managed) |
| Signing | EAS remote credentials | Apple automatic (no match) |
| Expo prebuild | Built into EAS | Run in ci_post_clone.sh |
| Main cost | EAS build quota | 25h/month free |
| Setup | eas.json + eas login | Partial ios/ commit + CI scripts |
I tend to burn EAS Cloud free builds for quick experiments, and use Xcode Cloud when I’m only shipping iOS.
What you should already have done
Before Xcode Cloud, these help a lot.
I covered them across EAS Local and EAS Cloud — highlights only:
- App registered in App Store Connect (Bundle ID set)
app.jsonios.bundleIdentifierfixed (e.g.com.testkun08080.template-expo-build)- You’ve submitted to TestFlight at least once (so the flow is familiar)
Xcode Cloud needs neither EAS nor EXPO_TOKEN.
Instead you need a minimal ios/ commit plus ci_post_clone.sh.
What is Xcode Cloud?
Xcode Cloud is Apple’s CI/CD service, configured from App Store Connect or Xcode.
Archive → TestFlight stays entirely on Apple’s side, so it’s a distribution path that doesn’t use EAS.
Before creating a workflow, get one Archive working on your Mac.
The next sections walk through that with screenshots.
Partial-commit strategy for ios/
In a Managed Workflow Expo app, ios/ is usually gitignored.
On Xcode Cloud, committing only the Xcode project and CI scripts (a partial commit) is the practical approach.
After expo prebuild, the template roughly looks like this:
ios/
├── ci_scripts/
│   └── ci_post_clone.sh           # commit
├── templateexpobuild.xcodeproj/   # pbxproj + scheme only
├── templateexpobuild.xcworkspace/ # commit
└── (Podfile, Pods, etc. gitignored → regenerated by prebuild)
Example ios/.gitignore:
# Ignore generated files; keep Xcode project + ci_scripts
*
!.gitignore
!templateexpobuild.xcodeproj/
!templateexpobuild.xcworkspace/
!ci_scripts/

templateexpobuild.xcodeproj/*
!templateexpobuild.xcodeproj/project.pbxproj
!templateexpobuild.xcodeproj/project.xcworkspace/
!templateexpobuild.xcodeproj/xcshareddata/
Every expo prebuild --clean regenerates Podfile and entitlements, so this minimal layout is easier than committing everything.
Make sure scheme files live under xcshareddata/xcschemes/ and are explicitly tracked in git.
ci_post_clone.sh
Right after clone, install Node and prepare the native project.
Xcode Cloud looks for ios/ci_scripts/ci_post_clone.sh.
Here’s what the template actually uses (ci_post_clone.sh):
#!/bin/sh
set -euo pipefail

cd "$CI_PRIMARY_REPOSITORY_PATH"

# Xcode Cloud images do not include Node.js by default.
if ! command -v node >/dev/null 2>&1; then
  brew install node@20
  brew link node@20 --force --overwrite
fi

npm ci
npx expo prebuild --platform ios

cd ios
pod install
In short:
cdtoCI_PRIMARY_REPOSITORY_PATH(repo root Xcode Cloud provides)- Install
node@20via Homebrew if Node is missing npm ci→expo prebuild→pod install
I use the same CI_PRIMARY_REPOSITORY_PATH pattern in my Flutter × Xcode Cloud post.
If CocoaPods isn’t on the image, adding brew install cocoapods right after Node usually stabilizes things.
If prebuild cache mismatches keep failing, switch to npx expo prebuild --platform ios --non-interactive --clean and pod install --repo-update.
When you need NODE_BINARY
If a React Native build phase can’t find Node, append this to ci_post_clone.sh:
NODE_BINARY="$(command -v node)"
echo "export NODE_BINARY=${NODE_BINARY}" > ios/.xcode.env.local
ios/.xcode.env.local is usually gitignored, so generate it every build.
Archive locally first
Before configuring an Xcode Cloud workflow, get Archive working on your Mac.
After expo prebuild and pod install, open ios/templateexpobuild.xcworkspace in Xcode.
Open the workspace and check signing
Select the project in the navigator and open Signing & Capabilities.
Check the Release configuration used for Archive too.
Confirm:
- Automatically manage signing is on
- Team is your Apple Developer account
- Bundle Identifier is
com.testkun08080.template-expo-buildand matchesapp.json
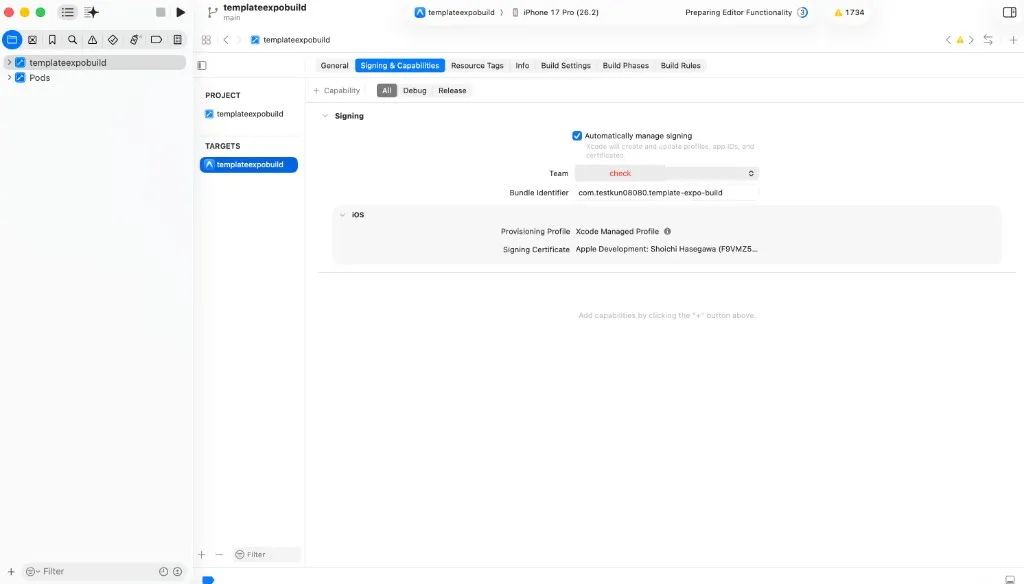
If you edited project.pbxproj by hand, make sure it still matches what Xcode shows.
With the partial-commit strategy I usually have:
CODE_SIGN_STYLE = Automatic;
DEVELOPMENT_TEAM = XXXXXXXXXX;
PRODUCT_BUNDLE_IDENTIFIER = com.testkun08080.template-expo-build;
IPHONEOS_DEPLOYMENT_TARGET = 15.1;
Xcode Cloud talks to App Store Connect, so you don’t manually manage certs or run fastlane match.
Reuse the Bundle ID you set up in the EAS Cloud post.
Create an Archive
Pick a device or Any iOS Device, then Product → Archive.
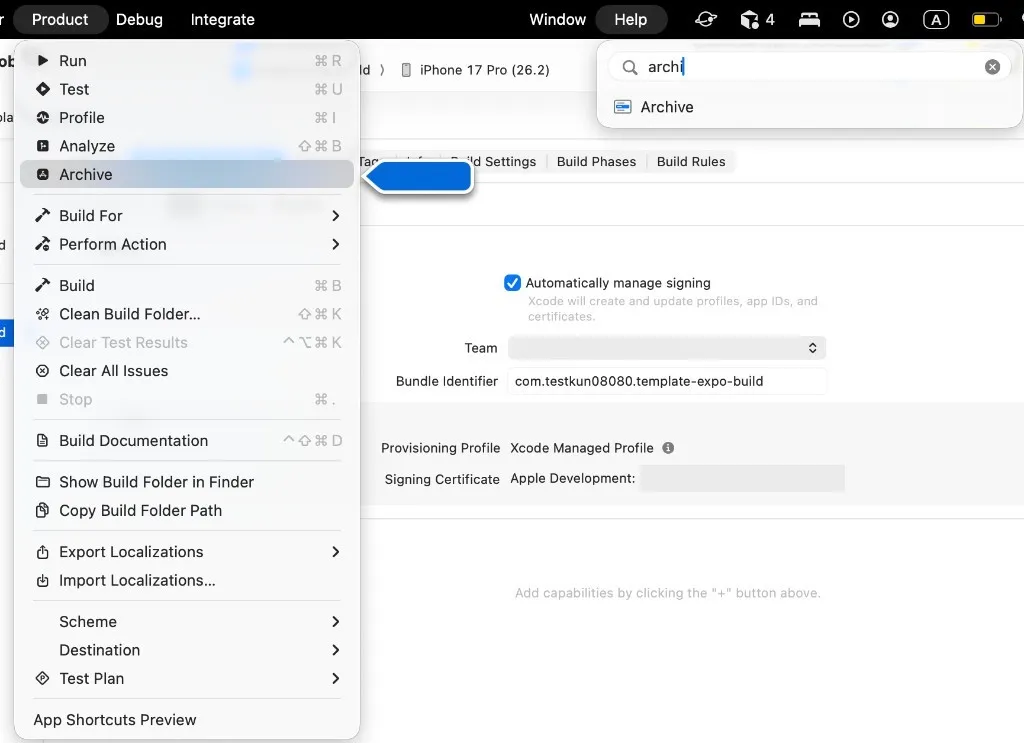
Organizer after Archive
When it succeeds, Organizer opens with the archive listed.
In the template it shows up as templateexpobuild, e.g. Version 1.0.0 (1).
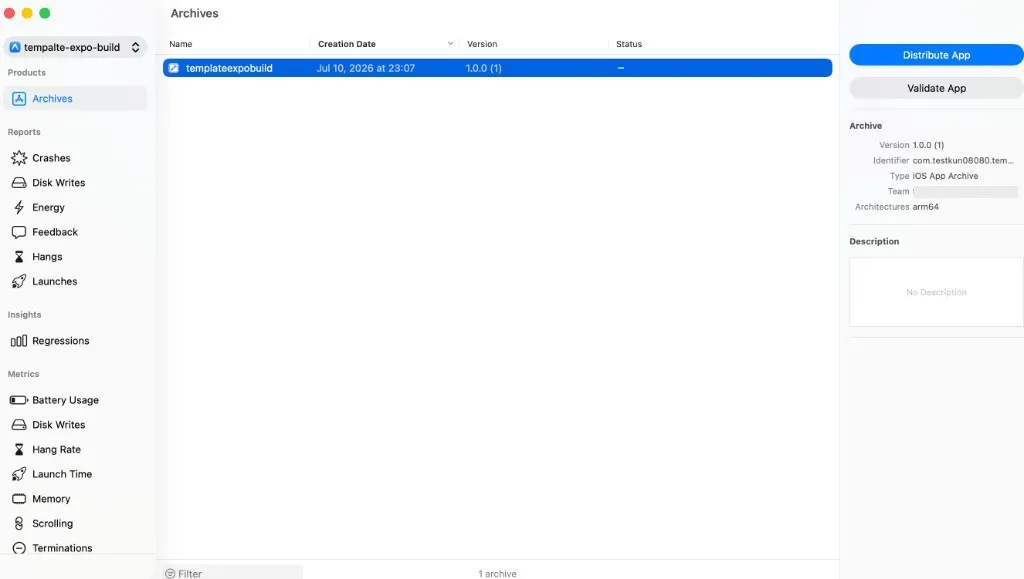
If Identifier shows com.testkun08080.template-expo-build and Team shows your account, signing is probably fine.
For a manual TestFlight upload you’d use Distribute App; for Xcode Cloud, move on to the workflow.
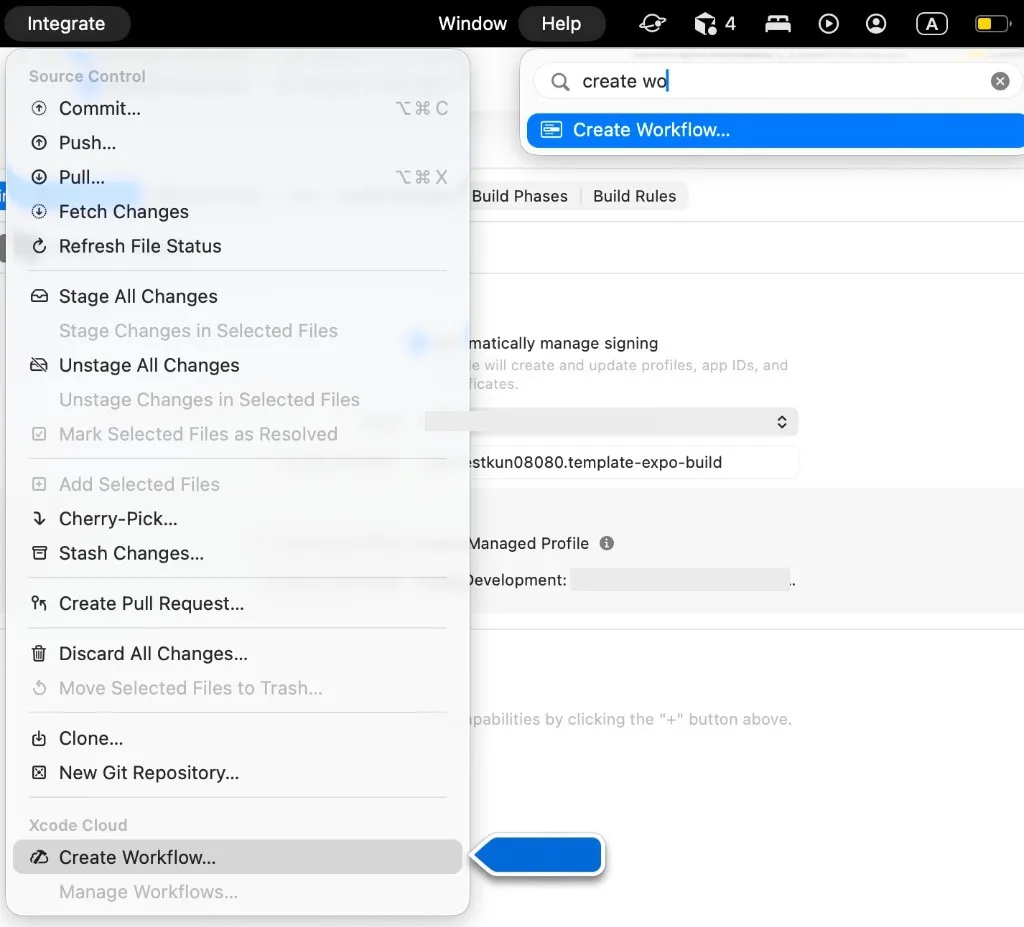
Once this works, Integrate → Create Workflow… often becomes available too.
Create an Xcode Cloud workflow
With Archive green, create the workflow.
Menu: Integrate → Create Workflow… (same place via Product → Xcode Cloud).
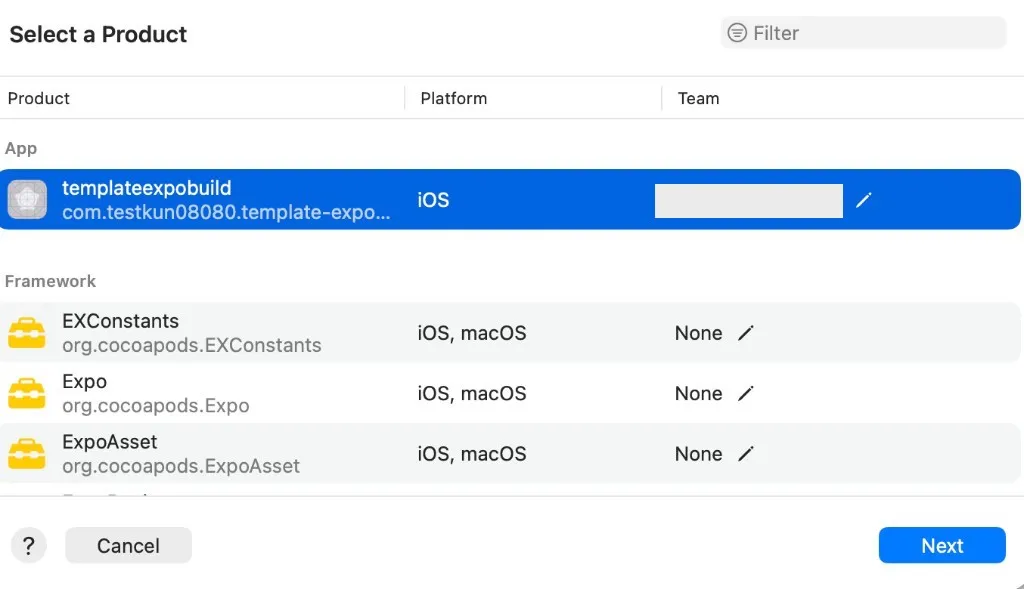
Select a product
Pick templateexpobuild from the apps in the workspace.
Confirm your account appears under Team.
Grant source access
When asked for GitHub access, check the target repo (e.g. testkun08080/template-expo-build-cicd) and continue.
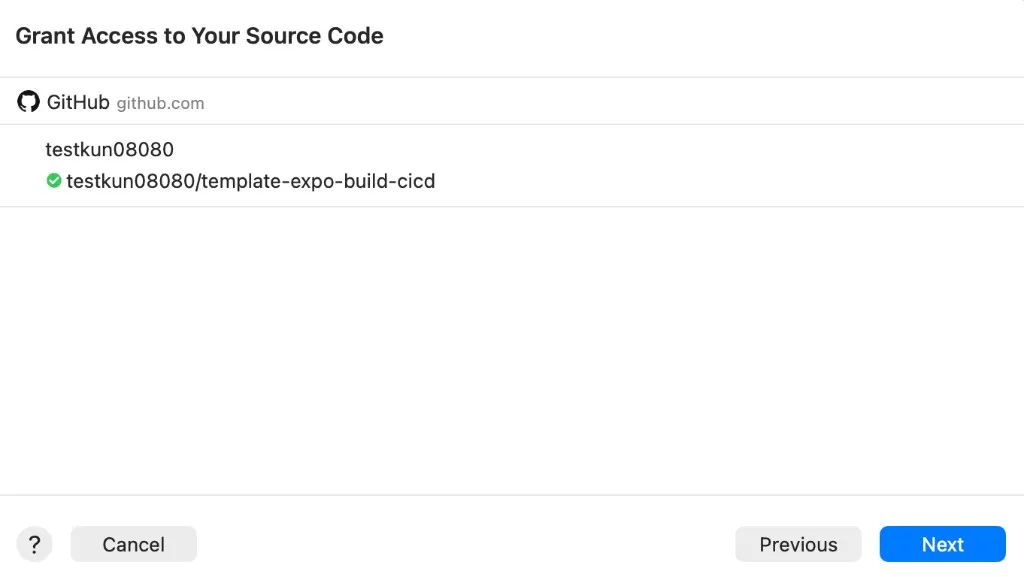
The first time you may need to link GitHub and Apple ID.
Also check Settings → Accounts in Xcode for a GitHub account.
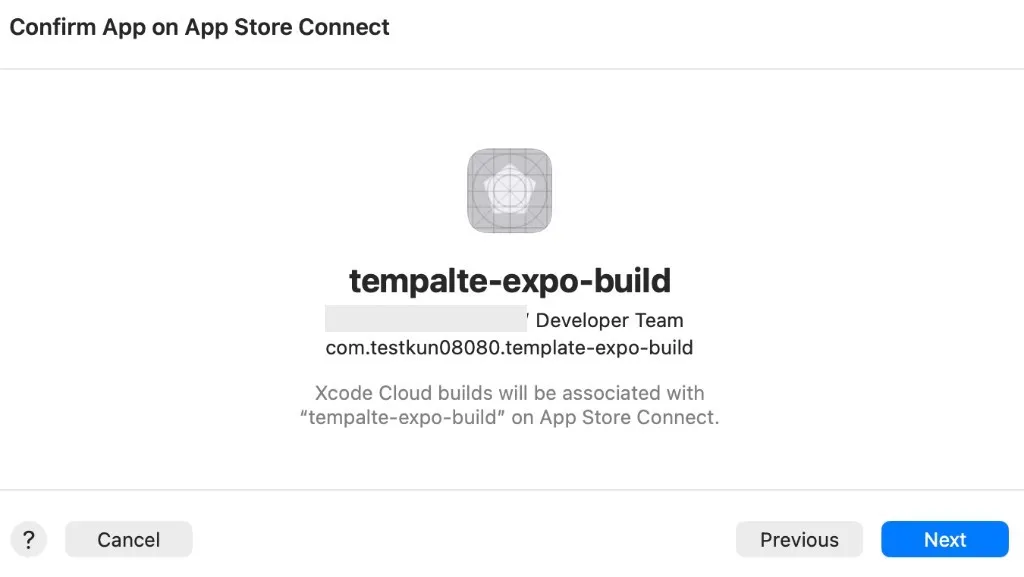
Link the App Store Connect app
You’ll see the App Store Connect app name and Bundle ID.
Confirm com.testkun08080.template-expo-build, then Next.
Review the workflow
Defaults look roughly like this:
| Item | Value |
|---|---|
| Start condition | Branch Changes (main) |
| Environment | Latest Release (newest Xcode) |
| Action | Archive (iOS) |
| Post-action | Often no TestFlight on first create |
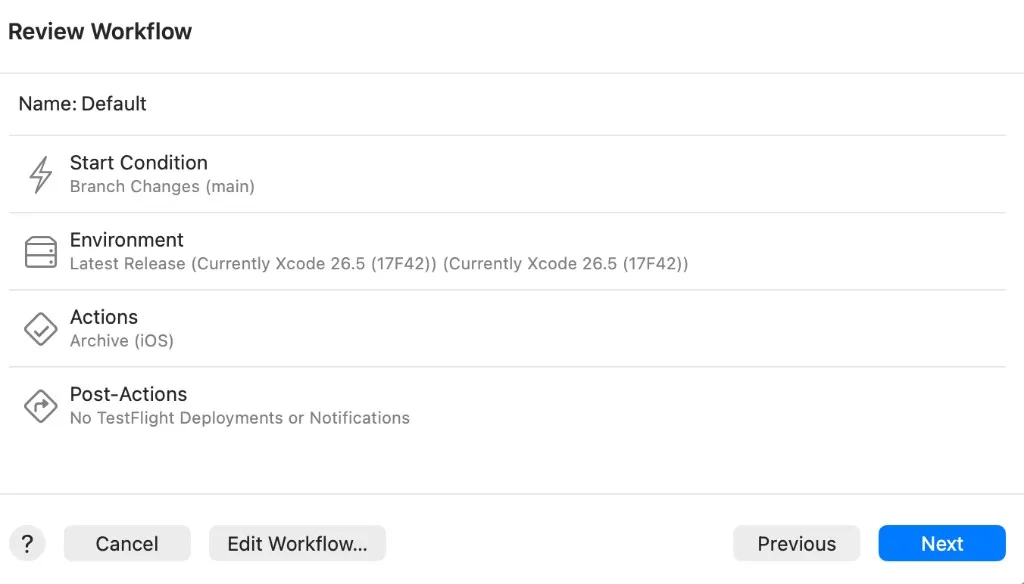
Scheme: templateexpobuild. Workspace: templateexpobuild.xcworkspace.
First-time wizards sometimes omit TestFlight under Post-Actions (see screenshot).
I also hit a case where editing the workflow at this point still didn’t show a TestFlight option.
Start the first build
You’ll get a Start Build screen.
Pick main and hit Start Build to run on Xcode Cloud.
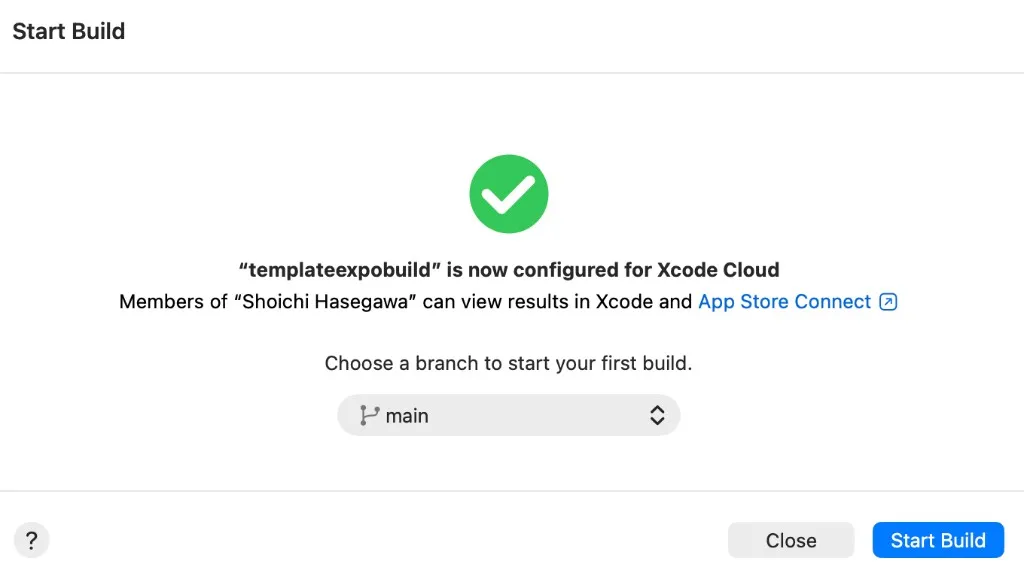
On my machine the Start Build sheet didn’t close on its own…
After pressing the button, confirm the build is actually running (next section), then close the sheet yourself.
Watch the build
Once started, you can follow progress in App Store Connect under the Xcode Cloud tab.
Status spins at first.
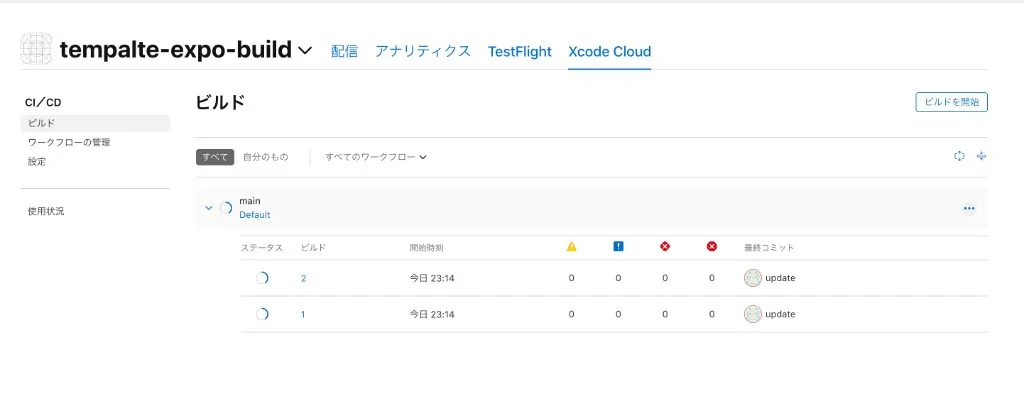
When done, you get a green check and build numbers (1, 2, …).
Warnings may appear, but if Archive succeeded the build can still go to TestFlight.
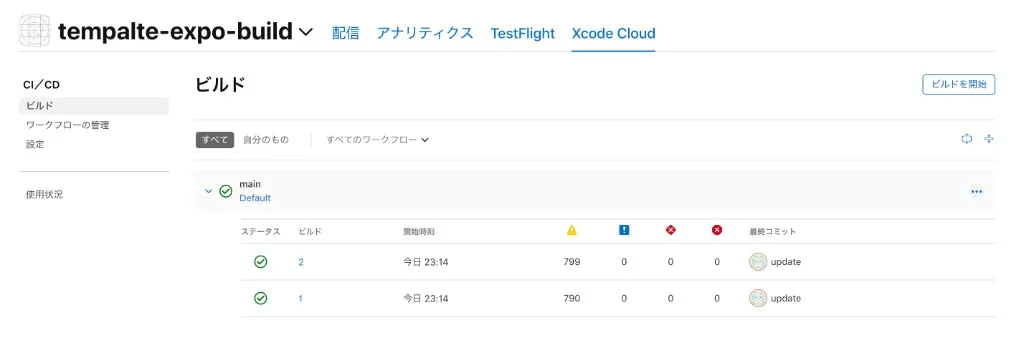
There can be a short lag before the build shows under the TestFlight tab.
Also peek at Xcode Cloud logs to confirm ci_post_clone.sh succeeded.
Enable TestFlight distribution
After one successful build, open the Archive - iOS action and under Distribution Preparation pick TestFlight (Internal Testing Only).
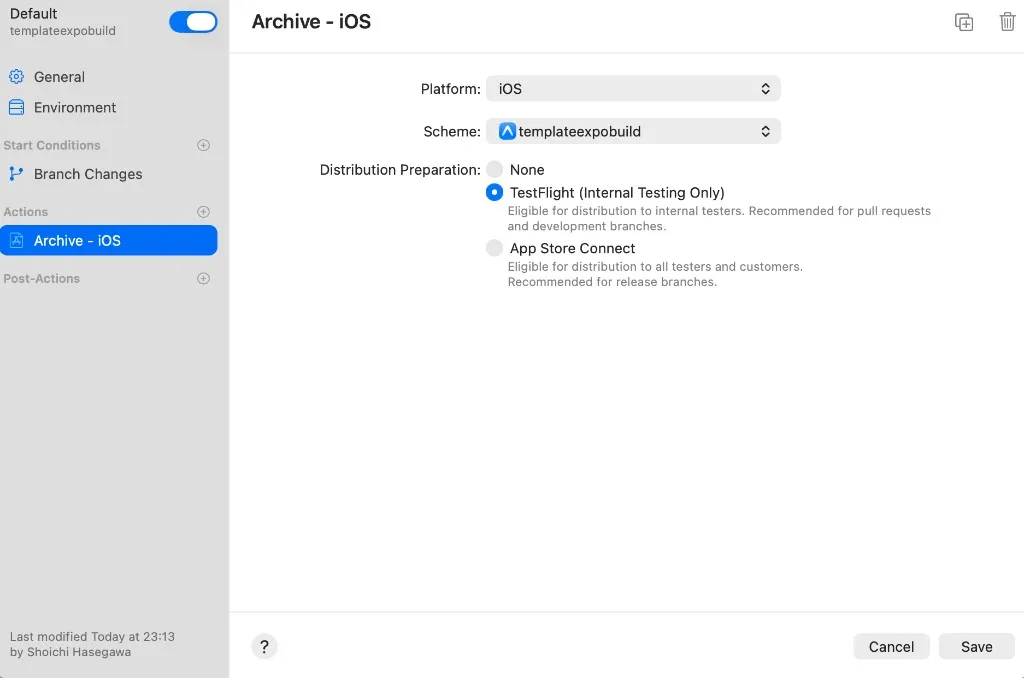
The first workflow wizard sometimes hides TestFlight.
If so, try the “TestFlight missing in the wizard” section below, then set it via Edit Workflow….
Common issues
TestFlight missing when creating the workflow
Sometimes the initial wizard never shows a TestFlight option.
On my setup this order fixed it:
- Confirm a build actually runs via Start Build (App Store Connect → Xcode Cloud tab)
- Restart Xcode
- Open Integrate → Manage Workflows… (or edit the workflow) again
- Check whether Archive - iOS → Distribution Preparation now lists TestFlight
If that still fails, ship one Archive-only workflow first, then add TestFlight.
Pod errors after prebuild
Put pod install --repo-update in ci_post_clone.sh to reduce cache oddities.
Put entitlements (App Groups, etc.) in app.json and let prebuild apply them.
Scheme not found
Confirm the project name after expo prebuild matches the scheme Xcode Cloud selects.
With partial commits you must explicitly track schemes under templateexpobuild.xcodeproj/xcshareddata/xcschemes/.
Build time
Every run does npm ci and often a clean-ish prebuild, so times can feel like a first build.
Lean on Xcode Cloud’s caching and keep the script minimal.
EAS works, Xcode Cloud fails
If EAS Cloud passes, Bundle ID and entitlements are usually fine.
On Xcode Cloud, walk ci_post_clone.sh logs, then NODE_BINARY, then whether pod install succeeded.
Wrap-up
- On Xcode Cloud you need Node +
expo prebuild+pod installinci_post_clone.sh - Partial-commit
ios/(Xcode project +ci_scriptsonly) stays manageable - Local Archive first → smoother workflow setup
- If TestFlight is missing: one Xcode Cloud build → restart Xcode
- Cost-wise, 25 free hours/month fits solo work well
Next I’ll put the same build → TestFlight flow on GitHub Actions —
both a fastlane match version and an EAS Cloud version.
→ Expo + GitHub Actions — TestFlight with fastlane match or EAS
Related links
- template-expo-build-cicd (sample repo)
- ci_post_clone.sh (template)
- Xcode Cloud docs
- Custom build scripts
- Expo prebuild
- Previous: EAS Cloud build